
Overview
Thunderbird is a popular free email client that you can use to manage all of your mailboxes. This walk through will show you how to configure Thunderbird to work with your email address.
Before you start
If you haven’t already, you will want to create an email address with your email hosting account. You can find information on that process here.
You will first need to ensure you have the correct password for the account. You can test this by trying to log into your webmail.
If you do not know your hosting service password, you can log into your hosting service and update it there.
Setting up a new account
If you have not yet set up an email address in Thunderbird, you should see the option on your home page as soon as you load the app.
If you already have emails set up, you will need to access the settings. This can be done by:
- Clicking on the menu button in the upper left and then selecting New > Existing Mail Account… (I know it doesn’t sound correct, but trust me)
- or
- Clicking on an existing email address in the list on the left hand side. You should now see Set Up Another Account on the home page. Click on Email.

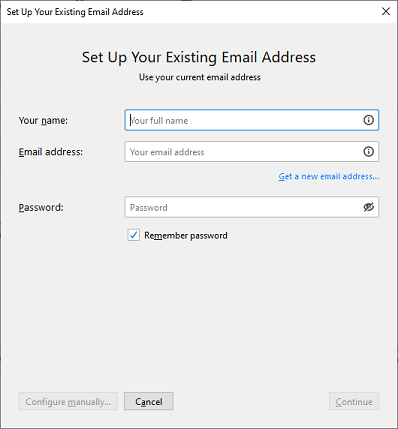
No matter which method you use, you should now see this screen.
Once you enter Your name, Email Address and Password, click on Configure manually…
You will see more fields show up
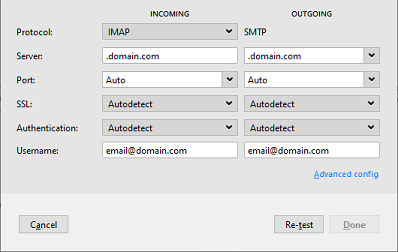
Incoming Settings
In the INCOMING column:
- Protocol: choose between POP or IMAP
- POP will download messages locally
- IMAP will keep messages synced to the server
- click on the link for more information on the difference between POP and IMAP
- Server: this should be mail.[your domain name]
- if you domain was example.com, this would be mail.example.com
- Port: this is the port used to connect to the mail server
- POP – use 995
- IMAP – use 993
- you can type the port number in, you don’t need to use the up-down arrows
- SSL: choose SSL/TLS from the drop down
- Authentication: choose Normal Password from the drop down
- User Name: your full email address (email@example.com)
Outgoing Settings
In the OUTGOING column:
- Protocol: SMTP is the only option
- Server: this should be mail.[your domain name]
- if you domain was example.com, this would be mail.example.com
- Port: use 465 (you can type the port number in, you don’t need to use the up-down arrows)
- SSL: choose SSL/TLS from the drop down
- Authentication: choose Normal Password from the drop down
- User Name: your full email address (email@example.com)
Now, click on Done.
Congratulations! You’ve just created your email account. Try sending yourself a test message to make sure it’s working.
Updating an existing account
To update your mailbox settings in Thunderbird, you need to access the settings menu. You can do this in one of two ways:
- Right click on the email address in the left hand column and then select Settings
- Left click on the menu icon in the upper right and select Account Settings
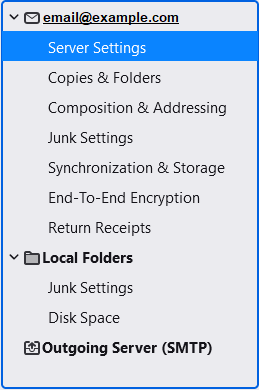
Once the account settings page loads, you should see your accounts on the left hand side with several categories of options.
In this guide, however, we will only be concerned with the Server Settings section and the Outgoing Server (SMTP) sections.
Incoming Settings
To get to the incoming settings, you want to click on the Server Settings section below the mailbox in question.
The rest of the setting here are personal preferences.
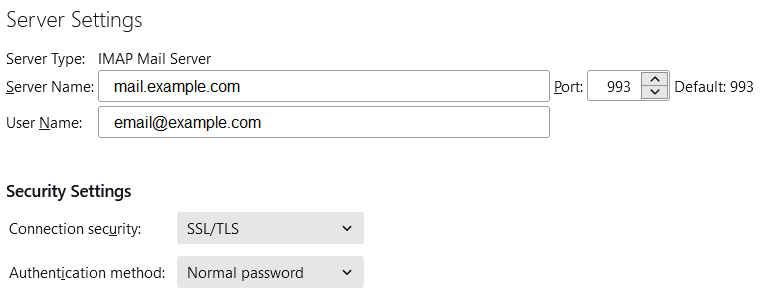
Server Setting
- Server Type: this will be either POP or IMAP
- this cannot be changed
- Server: this should be mail.[your domain name]
- if you domain was example.com, this would be mail.example.com
- Port: 993 for IMAP, 995 for POP (you can type the port number in, you don’t need to use the up-down arrows)
- User Name: your full email address (email@example.com)
Security Settings
- Connection Security: choose SSL/TLS from the drop down
- Authentication: choose Normal Password from the drop down
Outgoing settings
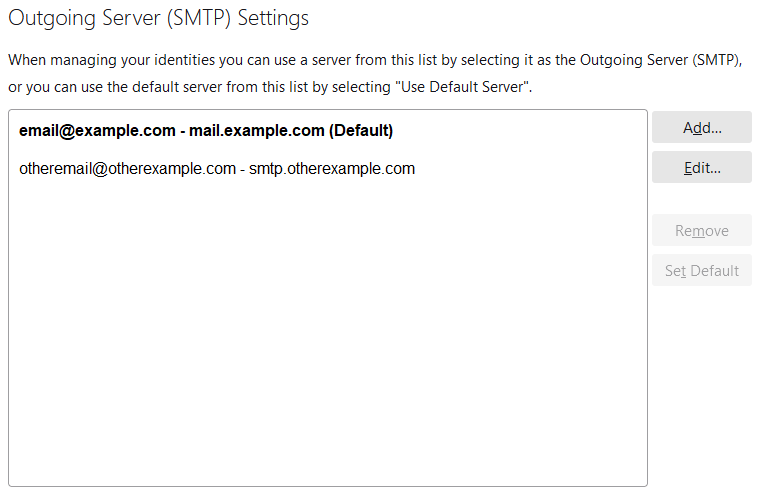
To get to the outgoing server settings, you first need to click Outgoing Server (SMTP) on the left hand side. You should now see a list of Outgoing servers.
Make sure the correct SMTP server is selected and click Edit… on the right hand side.
You should now see the outgoing server settings.
Settings
- Description: this is used to define this server in your Thunderbird client and is not server related. It can be whatever you like, but is typically just your email address
- Server: this should be mail.[your domain name]
- if you domain was example.com, this would be mail.example.com
- Port: 465 (you can type the port number in, you don’t need to use the up-down arrows)
Security and Authentication
- Connection Security: choose SSL/TLS from the drop down
- Authentication: choose Normal Password from the drop down
- User Name: your full email address (email@example.com)
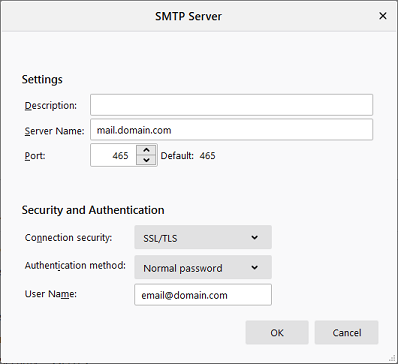
Once updated, click OK
Password Update
Once you make any changes to the above settings, or if your email password has been updated, the next time you check for mail, Thunderbird will ask you for your password. Once you enter the new password, Thunderbird will remember it.
If you have any further questions, please be sure to reach out to our support staff by using our chat service in your client area or by submitting a ticket.