
Overview
There are several reasons that you may want to add an additional contact or user to your client area. We refer to these as Sub-Accounts. We will go over them here in this guide, as well as how to add or update them.
Why would you need more then one contact?
There are times when you may want to allow someone to access to your account. This can be very useful if you have an accountant that manages your invoices and payments for you. It is also useful if you have a web developer that needs access to your hosting service or the domain controls. It can also be helpful if you have different business and billing addresses or several people that manage your account.
Each account and sub-account needs to have a unique email address as this is what is used as the username. If you have email hosting with us, you can create an email address to use for this new contact or an alias if you do not wish to manage another mail box.
Adding or Updating a Sub-Account
The process for adding a new sub-account or updating an existing one are the same. But first, you will need to log into your Client Area.
If you don’t know how to access your client area, you can find out here.
Once you log into your client area, you should see your Contacts on the left hand side of the screen. Click on the contact that you wish to update or + New Contact to add a new one.

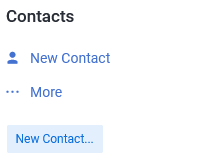
Once you click on the contact or the New Contact… button, you should see the Add New Contact screen.
If you click on a current sub-account, you will be able to update that contact’s information as well.
Contact Information

First, you can choose which account you want to update, or choose Add New Contact.
Next, fill in the contact information for the sub-account. Be sure to fill in all fields.
Please ensure that your email address unique and is an active email address. This is the address that we will send notices and invoices to. This is also were we would send the password reset emails.
Activate Sub-Account
If you want this contact to be able to log into your client area you will need to tick the Activate Sub-Account checkbox. If this sub-account is just for an alternative contact address (Ex. Billing address), you can leave this unchecked.
You will now see several the permissions options.

Here you can select what permissions this user will have and what parts of the client area they will have access to.
You will need to set up a password for this user. This user will be able to access your client area using their email address and the password set here.
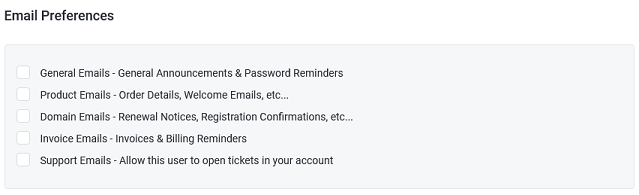
Email Preferences
Here you can set what notification emails this account will receive, whether it be product notices or invoices only.
Once you update the information, click Save Changes to save.

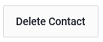
You can also delete the sub-account here by clicking the Delete Contact button.
If you have any further questions, please be sure to reach out to our support staff by using our chat service in your client area or by submitting a ticket.