
Is there an easy way to manage all of my WordPress sites in cPanel?
You can manage all of your WordPress sites using the WordPress Toolkit in your cPanel account. The Toolkit allows you to view all of your WordPress sites at a glance and know if they and their plugins and themes are all up to date.
What is the WordPress Toolkit
As mentioned above, the WordPress Toolkit is used to manage all of your WordPress sites, all in one place. You can use this app to install WordPress for any of your domains or subdomains, install themes and plugins and keep them all up to date.
Using the WordPress Toolkit can save you time by allowing your to update your WordPress install, theme and plugins without needing to log into each installation individually.
Whether you manage several WordPress sites, or even just one, you should check out the WordPress Toolkit.
Accessing your WordPress Toolkit
In order to start using the WordPress Toolkit, you first need to access your cPanel.
If you do not know how to access your cPanel, you can find out here.

Once logged into your cPanel, scroll down to the Domains section and click on the WordPress Toolkit app.
You should now be looking at your WordPress Toolkit main page.
The WordPress Toolkit
Once you are in your WordPress Toolkit, you will see an overview of all of your WordPress sites.
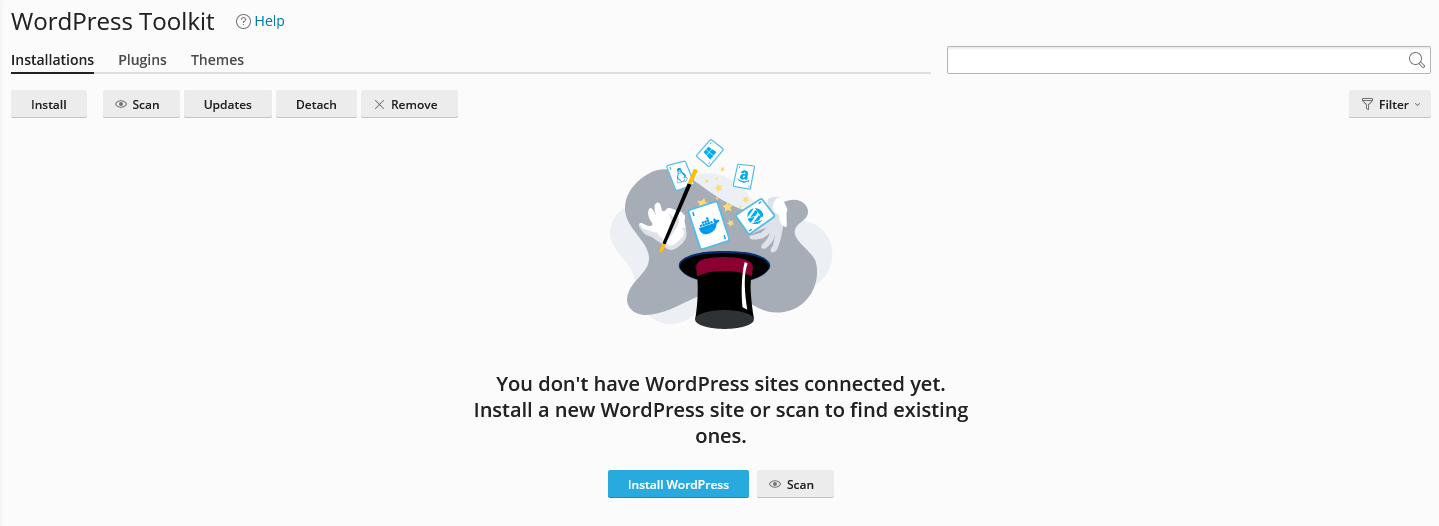
If you do not have any WordPress installations, you will be greeted with this page. From here you can Install WordPress, or you can Scan for WordPress installations that were installed using other tools, manually installed or migrated from another server.
If you already have a WordPress site installed on your domain, click the Scan button to add the installation to your WordPress Toolkit so you can manage it here.
Installing WordPress
If you do not have WordPress installed yet, you can use the WordPress Toolkit to install your WordPress files and create your database, as well as assist you with installing other common and recommended plugins.
Click on either the Install button in the upper left-hand side of the page, or the Install WordPress button in the center of the screen (this button will only show if there are no WordPress sites installed currently).
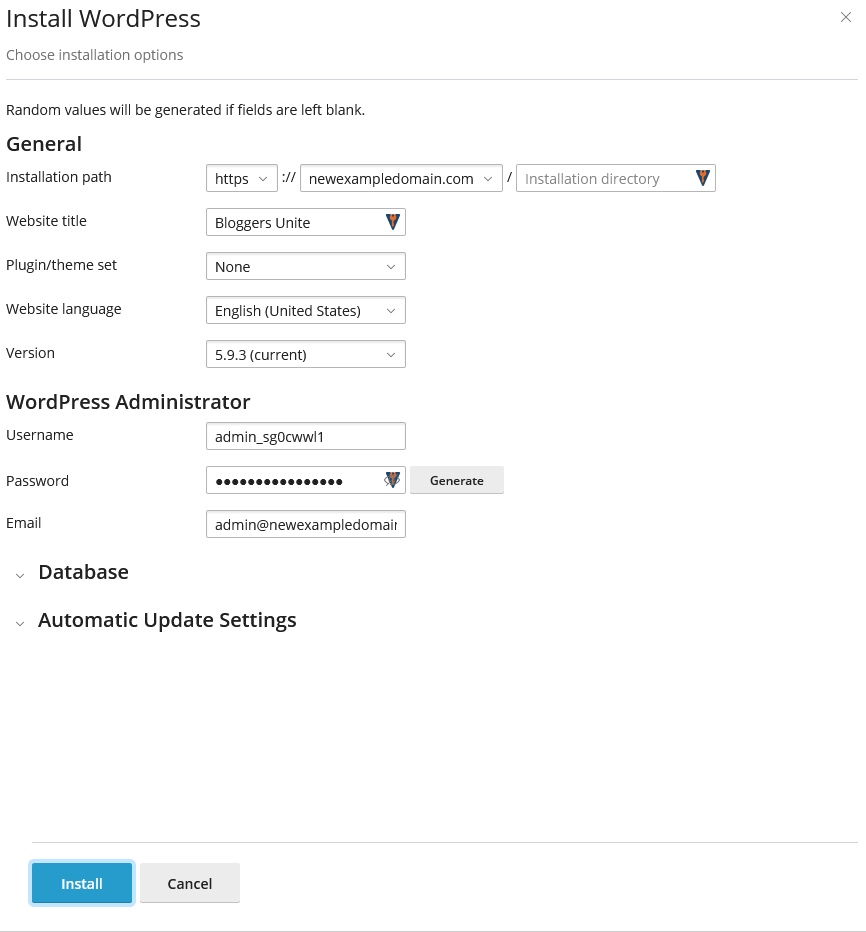
The Install WordPress menu will slide in from the left. This menu is divided into four sections with two hidden by default. The two hidden sections can be left at the default settings without any issues.
General
In the General section, you can choose which domain and directory to install your WordPress site and your Admin account.
- Installation Path
- First, you can select whether to use HTTP (non-encrypted) or HTTPS (encrypted). Encrypted is recommended, but will require an SSL certificate.
- Here you will select the domain you wish to install WordPress for. Choose your domain or subdomain from the drop down box.
- You can also enter the subfolder in which you wish to install WordPress
- If you wish to install your site in the document root for the domain, leave the Installation Directory field blank.
- Website title
- Here you can set the name of your WordPress site.
- The tool will generate a random one for you by default
- You can always update it later if needed
- Plugin/Theme set
- Here you can choose from any of the common plugin/theme sets that are included with the WordPress Toolkit
- You can add or remove themes and plugins later as needed
- Website Language
- Here you can set the default language of your WordPress site
- Version
- Choose what version of WordPress you would like to install
- It is recommended to use the newest version at all times
WordPress Administrator
Here you will create the Admin account for your WordPress installation. The Toolkit will generate a Username and Password for you by default, but you can enter your preference here. You can use the Password Generator to create a secure password for you. DO NOT USE “admin” as your username, you will get hacked.
The Toolkit will auto-fill your email address with the email set in cPanel. You can change it here if needed.
Database

In this section your can set your database name and credentials. This will be used to create the database in your cPanel and set up in your WordPress installation. You can customized these if you like, but it is fine to let the Toolkit set these randomly for you. It is rare that you will ever need these settings.
Automatic Update Settings
This section is where you can choose how and when your WordPress installation, plugins and themes update.
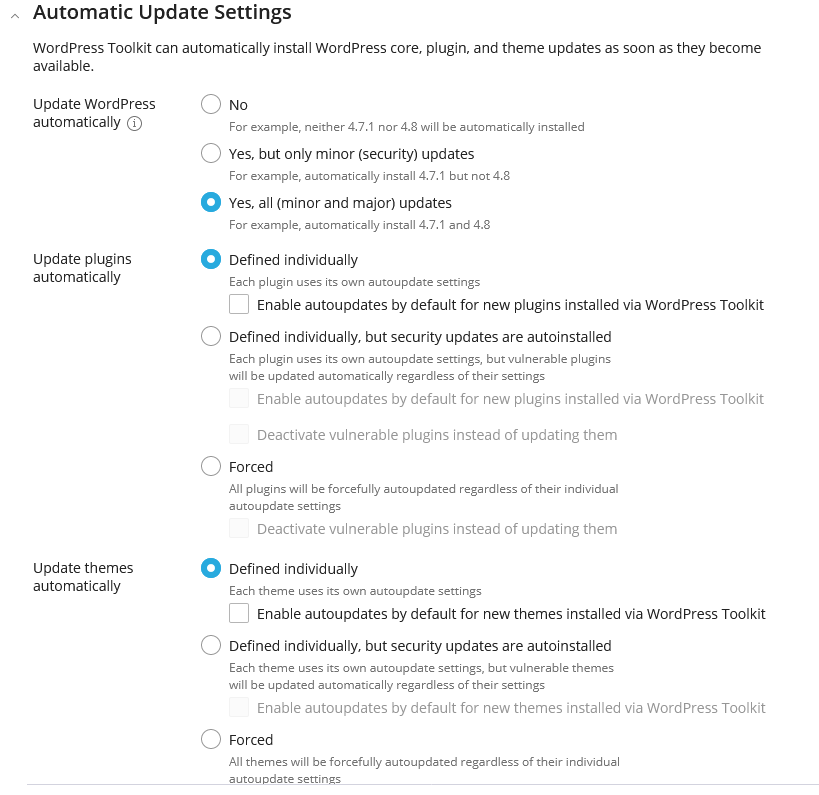
This section is divided into three parts.
Update WordPress automatically
Here you can choose whether your WordPress installation will update automatically. You can set it to update whenever a new version is released, or only when minor security updates are released.
- No
- For example, neither 4.7.1 nor 4.8 will be automatically installed
- Yes, but only minor (security) updates
- For example, automatically install 4.7.1 but not 4.8
- Yes, all (minor and major) updates
- For example, automatically install 4.7.1 and 4.8
Update Plugins automatically
You can choose whether your Plugins are updated automatically or if they are allowed to use their own update settings. You can also choose if vulnerable plugins are disabled if they cannot be updated.
- Defined individually
- Each plugin uses its own autoupdate settings
- Enable autoupdates by default for new plugins installed via WordPress Toolkit
- Each plugin uses its own autoupdate settings
- Defined individually, but security updates are autoinstalled
- Each plugin uses its own autoupdate settings, but vulnerable plugins will be updated automatically regardless of their settings
- Enable autoupdates by default for new plugins installed via WordPress Toolkit
- Deactivate vulnerable plugins instead of updating them
- Each plugin uses its own autoupdate settings, but vulnerable plugins will be updated automatically regardless of their settings
- Forced
- All plugins will be forcefully autoupdated regardless of their individual autoupdate settings
- Deactivate vulnerable plugins instead of updating them
- All plugins will be forcefully autoupdated regardless of their individual autoupdate settings
Update themes automatically
Now, you can choose your automatic update settings for your themes. You can choose whether your theme is allowed to use its own update settings, is updated automatically only when security updates are released, or forced to be updated.
- Defined individually
- Each theme uses its own autoupdate settings
- Enable autoupdates by default for new themes installed via WordPress Toolkit
- Each theme uses its own autoupdate settings
- Defined individually, but security updates are autoinstalled
- Each theme uses its own autoupdate settings, but vulnerable themes will be updated automatically regardless of their settings
- Enable autoupdates by default for new themes installed via WordPress Toolkit
- Each theme uses its own autoupdate settings, but vulnerable themes will be updated automatically regardless of their settings
- Forced
- All themes will be forcefully autoupdated regardless of their individual autoupdate settings
Once you have all of your settings set to your preference, click the Install button at the bottom left-hand side to begin the installation.
Once the installation is completed, you will be brought back to the WordPress Toolkit Installations page.
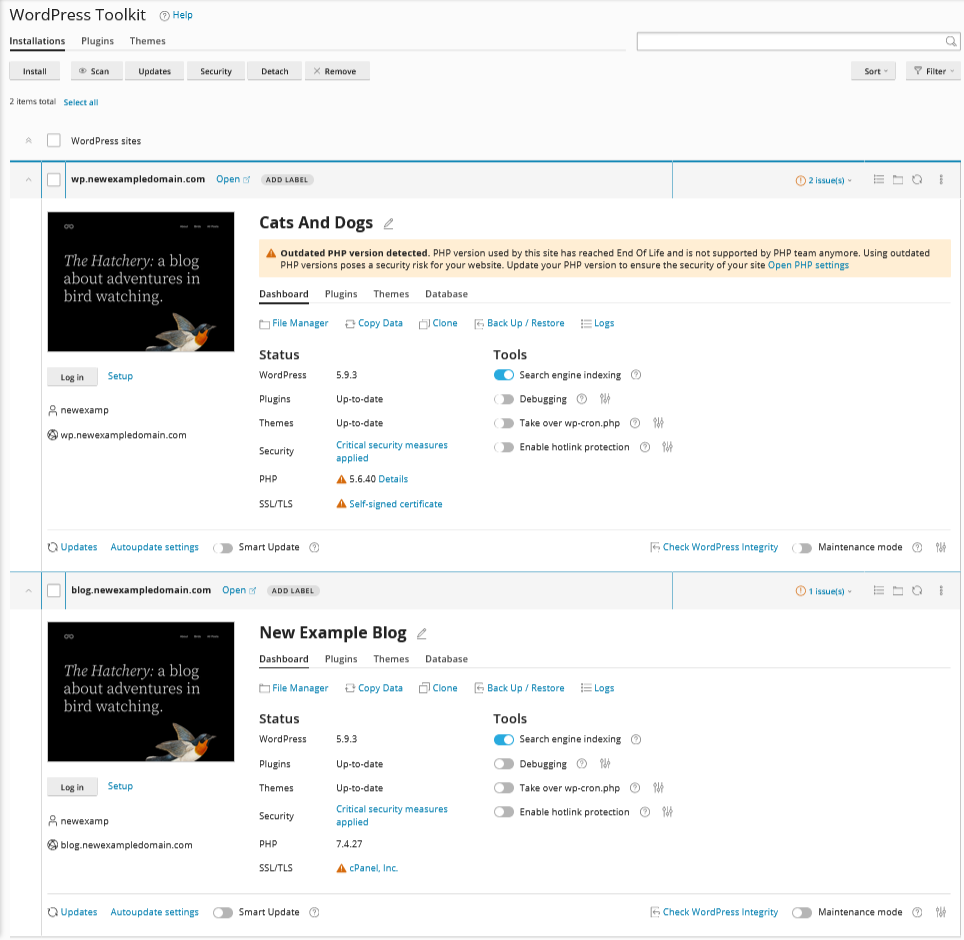
The WordPress Toolkit Installations page
Once you have a WordPress installation, you can manage from the Installations page in the WordPress Toolkit. From here you can find a summery of each of your WordPress installations.
There is a lot of information on this page for each installation, so we will divide it up into sections.
Top menu bar
Along the top of each installation you will see several options.
- Hide arrows
- You can click this icon to hide this site summery, or click here to show if already hidden
- This can be helpful if you have several installations
- Domain name
- The name of the domain for this installation
- Open
- This link will open your website in a new tab
- Add Label
- Here you can add a label to help sort an manage your installations (Production, Staging, Testing, etc)
- Issues
- This will show you what issues this installation currently has that should be addressed
- Links
- Here you will see links for the Logs, File Manager, and a refresh button.
- There is also a drop down menu that contains other options
- Check Updates
- Check Security
- Update Site URL – change the site address
- Detach – remove the site from the WordPress Toolkit (site will still be live)
- Remove – remove the site and delete the files and database
Left-hand column
In the left-hand column, you will see a thumbnail of the home page for the site.
Below this, you will see a Log In button that will automatically log you into your WordPress dashboard.
You will also see a Setup button that will allow you to view your username and password, as well as allow you to update your password or email address if needed.
You will also see the cPanel username and the domain for the installation.
Right-Hand column
Here you will see four tabs, each containing more information regarding your installation. We will go over each of these tabs below. Click the links to jump to that section.
Dashboard
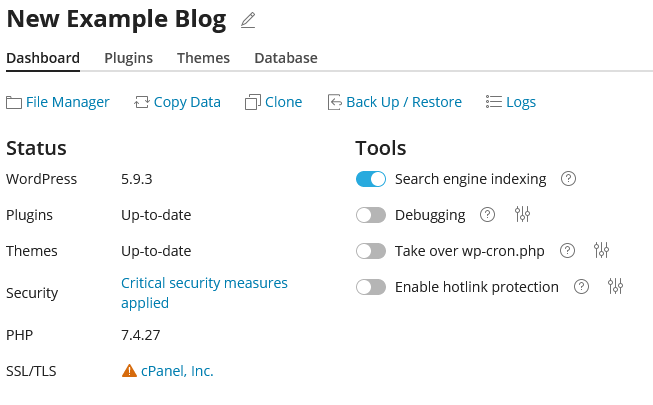
In the Dashboard, you will see a summery of your WordPress installation, as well as several management links.
Upper Menu Bar
Here you will find links to help manage your WordPress site
- File Manager
- This will open your file manager in the WordPress install folder
- Copy Data
- This can be used to copy one of your WordPress installations to another install
- Clone
- This will allow you to create a copy of your WordPress installation and install it in a new or existing domain or subdomain.
- This can be used to create staging sites.
- Backup / Restore
- This menu can be used to create a back up of your WordPress installation, or restore your install from a previous back up
- Logs
- This will show you the logs for this WordPress install.
- This can be used for trouble shooting issues.
Status
Here you can see details on your WordPress installation. You will see warning on any part of this summery that needs attention.
- WordPress
- The current WordPress version
- Plugins
- The update status of your Plugins
- Themes
- The update status of your Themes
- Security
- The security status of your WordPress install and any potential issues
- PHP
- The current PHP version of your installation and whether it is out of date
- SSL/TLS
- The SSL/TLS status of your site, as well as the SSL certificate type.
Tools
Here you can toggle some of the many tools that you can help manage and secure your WordPress Installation. You can click on the “?” icon for each option for more information. If you click on the settings icon to the right of the tool, you will see the advanced options for that tool.
- Search engine indexing
- Debugging
- Take over wp-cron.php
- Enable hotlink protection
Click here to return to the above section.
Plugins
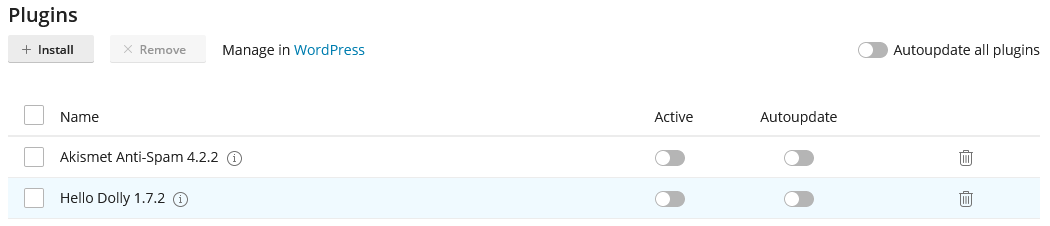
From this tab, you can see all of your currently installed plugins. You can also add new plugins by clicking on the +Install button.
You can also enable Autoupdate on all of your plugins by using the toggle on the right-hand side.
You will see several columns to the list
- Check box
- Use this to select plugins for bulk tools, such as the remove button beside the + Install button
- Name
- The name of the plugin and version number
- Click on the “i” icon to see a description of the plugin
- Active
- Toggle whether the plugin is active
- Autoupdate
- Toggle the autoupdate status of the plugin
- Delete
- Remove the plugin
Click here to return to the above section.
Themes
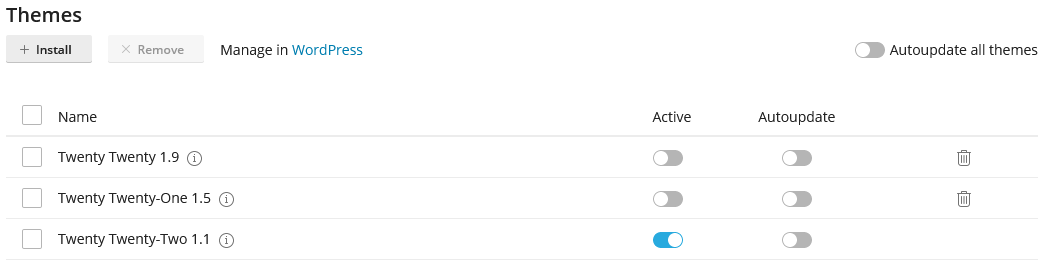
Here you will see all of your currently installed themes and their version numbers. You can install new themes here or you can choose which theme is active here as well.
You can also enable Autoupdate on all of your themes by using the toggle on the right-hand side.
- Check box
- Use this to select themes for bulk tools, such as the remove button beside the + Install button
- Name
- The name of the theme and version number
- Click on the “i” icon to see a description of the theme
- Active
- Choose which theme is active
- Autoupdate
- Toggle the autoupdate status of the theme
- Delete
- Remove the theme
- You cannot remove the currently active theme
Click here to return to the above section.
Database
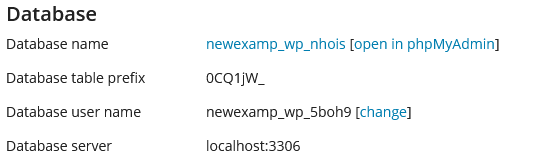
This tab will show you the database settings. There is also some helpful links to the database management section in cPanel.
- Database name
- This is the database name for the WordPress install
- Clicking on the database name will open it in the cPanel Database section
- You can also open the database in phpMyAdmin by clicking on the link. This should only be done by advanced users
- Database table prefix
- This is the prefix used in the database for this installation
- Database user name
- The username used for the WordPress database
- You can change the username here if needed
- Database server
- This is the address of the database server
- This should always be
localhost:3306
Click here to return to the above section.
Bottom Menu Bar
The bottom menu bar contains several options for maintaining and updating your WordPress installation.
- Updates
- This will check your installation and any plugins or themes for updates
- Autoupdate Settings
- This will allow you to modify your autoupdate settings
- Smart update
- This will toggle the Smart Update system, which will create a full staging site for your install and runs several tests and screenshots to allow you the check for issues before modifying your existing site.
- Check WordPress Integrity
- You can use this tool to check the WordPress installation files to insure that the base files have not been modified.
- You should do this if you think your site has been compromised
- Verify Checksum
- This will check your files against the known WordPress files and look for discrepancies.
- Reinstall WordPress Core
- This will reinstall your WordPress core files
- This should not affect your existing site, but you should back it up first.
- Maintenance Mode
- When you turn on Maintenance mode, any visitors to your site will be redirected to a maintenance page instead of your home page.
- This is used when updating your WordPress site or to temporarily hide the site from the public
- Maintenance mode is activated automatically when the site is being autoupdated
- You can customize the maintenance page of your site by clicking on the settings icon to the right of the maintenance mode toggle
Additional Information
You can find more information on the WordPress Toolkit on the cPanel YouTube channel.
If you have any further questions, please be sure to reach out to our support staff by using our chat service in your client area or by submitting a ticket.