
Overview
WordPress is by far the most popular website building tool. However, installing it manually can sometimes be difficult, especially for the casual user. Luckily, we have tools that can help.
What is WordPress
WordPress is a highly customizable, but easy to use CMS (content management system) used extensively to create and manage websites. WordPress is used for everything from small personal blogs (where it got its start) all the way up to professional sites for large companies.
The strength of WordPress is in the vast amount of plugins, themes and customization options available for the platform. This strength, however, can also be a weakness. Because of the open source nature of WordPress, the shear amount of plugins and themes available for the platform, as well as the popularity of the platform itself, WordPress is a prime target for all sorts of thieves, frauds and hackers.
Fortunately, there is also a wealth of security services (both free and subscription based) and support sites available to help keep your site and data safe from would be dastardly despots.
As for support, the community website wordpress.org has many support articles and a forum to help you out. You can find hours of tutorials on youtube.com.
The main thing you need to know is that a WordPress site is that it is not a “Once and Done” experience. If you do not keep the WordPress install and any plugins and themes up to date, it will become vulnerable. Fortunately, we have some tools that can help you out.
Scope of this guide
There is no way we could tell you everything you need to know about using WordPress in a guide like this (there are whole sites that are dedicated to this). What we can do is show how you can get a WordPress site installed in your cPanel and then gently push you in the right direction.
You can install WordPress manually by downloading the software and uploading it to your public_html folder, extracting the files, create a database and configure everything manually, but this can be quite a process and fairly difficult for someone that is not familiar with these things. At luck would have it, your cPanel has a tool that will do most of the heavy lifting for you.
By installing WordPress using the cPanel tool, you will also have access to several tools that would not be available if you install manually. This includes the ability to log into your WordPress admin from the cPanel without needing the WordPress password, as well as the ability to back up your site, create staging sites for updates and even clone your site.
WordPress installation
To install WordPress for your domain, you first have to navigate to the Software section of your cPanel and clink on WordPress Manager by Softaculous.
If you are planing on installing WordPress in a Subdomain or Addon domain, you will need to create them first.

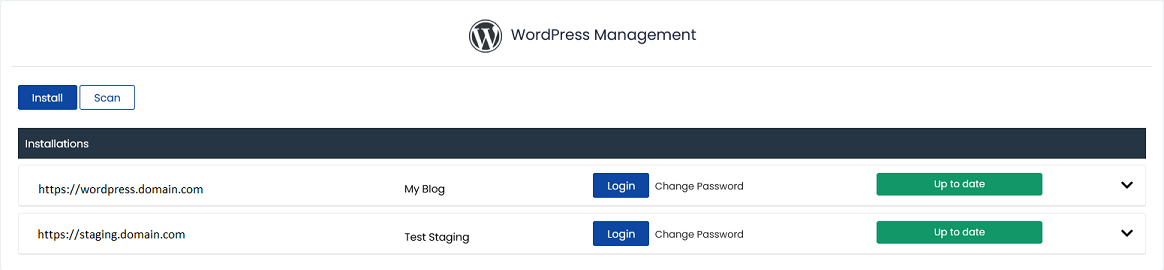
Once you click on this tool, you should see a list of any WordPress installations you have already installed. You will also see buttons to Install and Scan.
- Install – this will allow you to install a new WordPress site.
- Scan – this will scan your domains shared folder for an existing WordPress site that may have been installed manually or by other means.
Once you click Install, you will be greeted with the WordPress install tool.

While there are several options on this page, we are only going to concern ourselves with the Install section. You can choose either the Custom or Quick Install. The only difference is that there are some sections that don’t show under Quick Install (Site Settings, Choose Language, and Advanced).
Software Setup

In this section, you will see the Software Setup and a toggle for either the Quick or Custom Install. As mentioned, the only difference is what sections are displayed.
- Choose installation URL
- Choose Protocol – here you will choose between http:// (not encrypted) or https:// (encrypted). You will need an SSL certificate to use https://. You can also choose whether your site will be use the www prefix. This is personal preference only.
- Choose Domain – you can select any domain, addon domain or subdomain that you have set up in this cPanel account.
- In Directory – here you can choose what directory you want the WordPress files installed in. If you want to install the site in your document root folder, you want to leave this blank. If you already have a site in that folder, you can install the site in a sub-folder so it does not interfere with the existing site. You can move it later if you prefer.
- Choose the version you want to install – typically, you will want to install the newest WordPress version. The only reason you may not want to is if there are plugins or themes that are not compatible with the latest version. While it is possible to use older versions of WordPress and its plugins and themes, for security reasons it is not recommended.
Site Settings/Admin Account
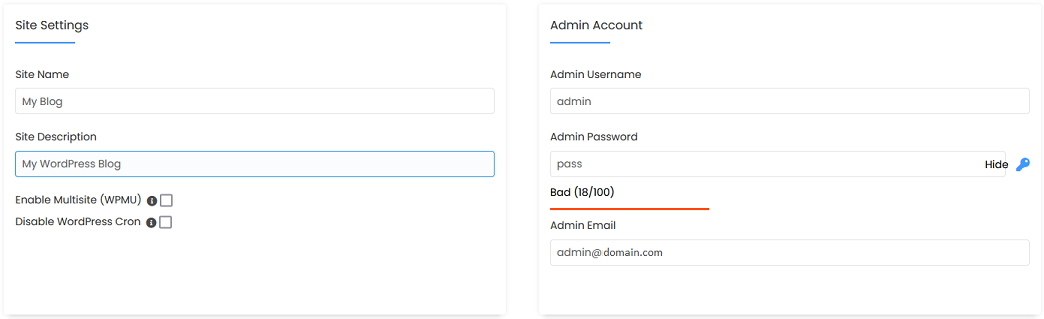
Site Settings
Here you will set up your site name and description. It is fine to leave these at the default settings as you will always be able to update it later.
Admin Account
Here is where you will set up your admin account. You DO NOT want to leave these at the default settings.
Choose a personal username (hackers know that many sites use admin as the username), a secure password and make sure you use an active email address (it is a good idea to create and email for the sole purpose of managing your website, something like webmaster@domain.com). You remember how to create an email address, don’t you?
There are other options here (Enable Multisite, Disable WordPress Cron), but they are beyond the scope of this guide.
Choose Language/Select Plugin(s)

Choose language is pretty self-explanatory.
Select Plugin(s) allows you to install some basic plugins. These are optional, but you should select the Limit Login Attempts plugin. This will help protect your site from brute force attacks. The others are completely optional.
You also have the option to create your own plugin set. Once again, this is outside the scope of this guide.
Advanced Options
Clicking on the + symbol to the left of Advanced Options will open the advanced options menu. These options mainly focus on your database settings and auto updates and backups.
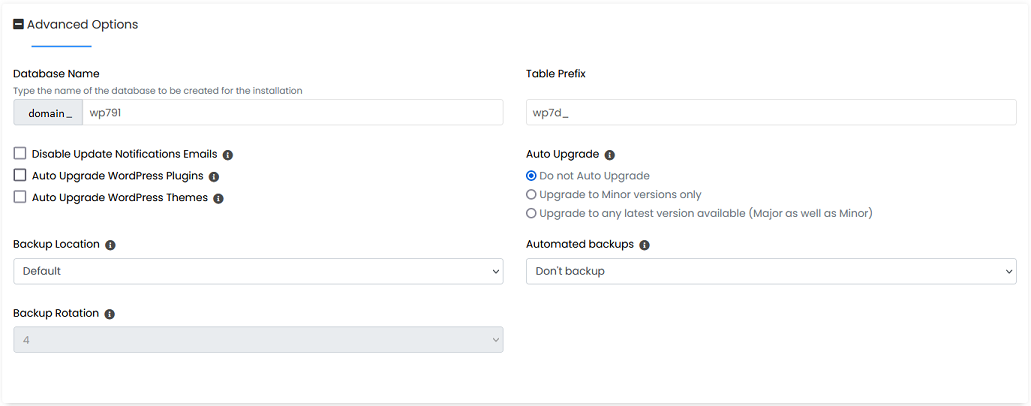
Database Name
Here you can choose a name for your WordPress database. The script will generate a random name for you by default, but you can change it if you like. This must be seven characters or less.
You can also select whether disable notification emails or to enable Auto Upgrade for your WordPress themes and plugins. While this may seem to be a good idea, depending on the plugins you use, you may want to control this manually.
Table Prefix
This is the prefix that the script will add to all of the tables in the WordPress database. The script will generate one, but you can change it if you like, but it needs to end with an underscore “_”.
Backup Location
This is where the script will save any backups created. For now, the only option is Local.
Automated backups
Here up can set the frequency of the site backups. Depending on how active your site is, you may want to set this to back up quite frequently. If the site is fairly static, it is less important.
Backup Rotation
This is how many backups the script will keep before overwriting the old backup. If you set this too high, and you have a large site, you could run into disk space issues.
You will need to keep an eye on your disk usage when using automatic backups, as the space used by the backups is included with your overall disk usage. If you keep too may backups, you will run into disk space issues.
Select Theme
Here you can select a theme for your website. You can select one here now or you can always update it later.
Finished
You will find the Install button on the bottom of the page.

There is also the option to email the WordPress setting to an email address. This can be useful for record keeping or if you have someone that will be managing the site for you. This email does not show the password.
Once you are happy with all the settings, click the Install button. The script will now run and install your WordPress site and create the database. Once it completes, it will give you a summary of the install, as well as provide the links to start using your new site.
Congratulations, you now have a WordPress site.
If you have any further questions, please be sure to reach out to our support staff by using our chat service in your client area or by submitting a ticket.
2 replies on “Softaculous WordPress Installer”
[…] you will need a WordPress site that is being managed by Softaculous. Check out this guide for information on creating a new WordPress site or adding an existing one to your cPanel […]
[…] Installing a WordPress site, for example, is as simple as selecting the WordPress installer from the Softaculous menu and clicking Install. Once you enter your information, the script will create the database and install the latest WordPress version. […]