Overview
WinSCP is a popular FTP client for Microsoft Windows and supports several protocols, including FTP, FTPS, SCP, SFTP, WebDAV or S3 file transfer protocols.. Here is how to connect to our servers using WinSCP.
Before you begin
Before you can connect to your server with an ftp client, you will need to create an ftp account first.
You can find information an creating an ftp account using cPanel here.
You will need to know your server name or host, your ftp username and ftp password, as well as the port.
You can also use your cPanel username and password to connect.
- Server Name
- this would be your either your domain name or the server that your account is on (if your website is not pointing to us, you will need to use the server name)
- Username
- your username will be what you set up in the FTP Accounts app in cPanel and will end in your domain name (ftp@example.com)
- Password
- your ftp password (or your cPanel password if you are using the cPanel username)
- Port
- the default port for ftp is 21, this will work with our servers
Installing WinSCP
You can download WinSCP at their website https://winscp.net/eng/index.php. Click on the “download now” button to view the latest version. Once on this page, click the green button to download the installer. This program is free to use.
Once you download the setup file, run it to install the program.
Connecting to server
Once you get the application installed, you now need to configure it to connect to the server to begin uploading your files.
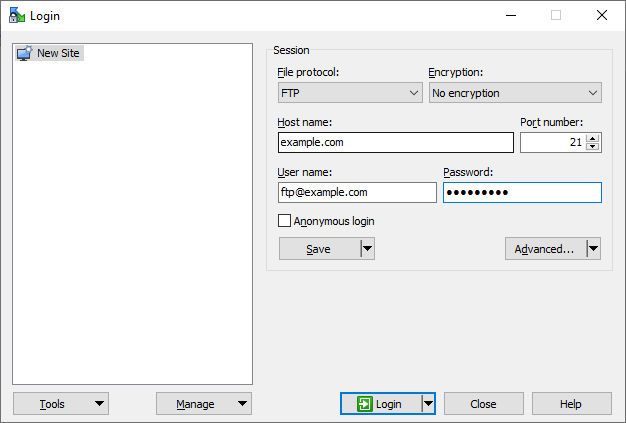
You should be greeted with the Login screen.

While there are several options available on this page, the only thing we need to worry about are the Session settings. Here is where you will enter your FTP information.
- File Protocol
- Select FTP from the drop down.
- Encryption
- Use TLS/SSL Explicit Encryption or No Encryption
- If you use encryption, you may see an SSL error. This is because the program is finding the server SSL. Click Yes to continue.
- Host name:
- This would be your domain name or you can use your server name or IP address.
- Port number
- This should default to 21.
- User name
- This is your FTP username that you set up in your hosting account.
- Password
- This is your FTP password that was set at the time the account was created.
- Anonymous Login
- This should stay unchecked
Once you have all this information entered, you can click on the Login button at the bottom. You should now be connected to the server.
Transferring files
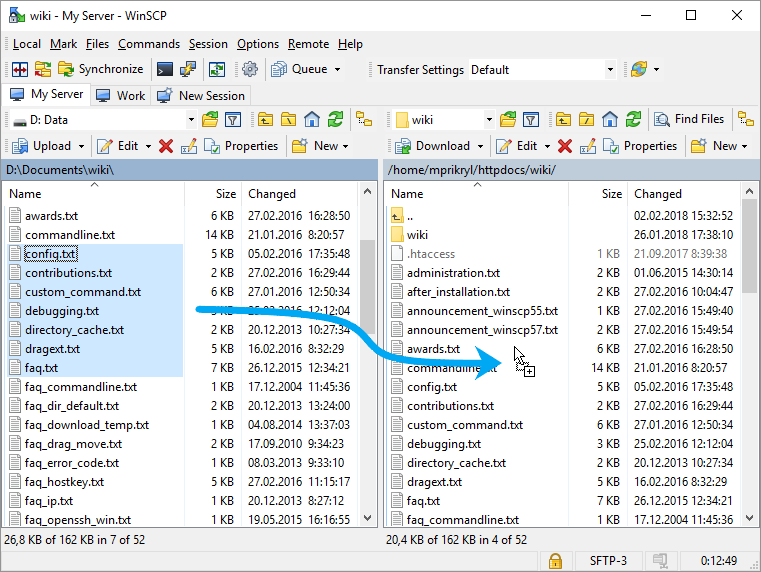
Once connected, you can begin transferring files between your local machine and your web server.

On the left hand side of the screen, you will see the file structure of your local machine.
On the right hand side of the screen, you will see the file structure of the remote server (your cPanel account).
You can transfer files now by dragging and dropping from one side to the other, or by right clicking on a file or folder and selecting upload/download.
If you have any further questions, please be sure to reach out to our support staff by using our chat service in your client area or by submitting a ticket.

