
Overview
CoreFTP is a free FTP client for windows with an option for paid advanced features. While it may look more basic then other FTP clients, it is just as powerful. Here is how to connect to our servers using CoreFTP.
Before you begin
Before you can connect to your server with an ftp client, you will need to create an ftp account first.
You can find information an creating an ftp account using cPanel here.
You will need to know your server name or host, your ftp username and ftp password, as well as the port.
You can also use your cPanel username and password to connect.
- Server Name
- this would be your either your domain name or the server that your account is on (if your website is not pointing to us, you will need to use the server name)
- Username
- your username will be what you set up in the FTP Accounts app in cPanel and will end in your domain name (ftp@example.com)
- Password
- your ftp password (or your cPanel password if you are using the cPanel username)
- Port
- the default port for ftp is 21, this will work with our servers
Installing CoreFTP
You can download CoreFTP at their website http://www.coreftp.com/. Either click on the Download button, or click it in the top menu bar to get to the download page. Once on this page, choose the version that works for you. For most modern machines, this would be the CoreFTP LE : free version (64-bit).
Once you download the setup file, run it to install the program.
Connecting to server
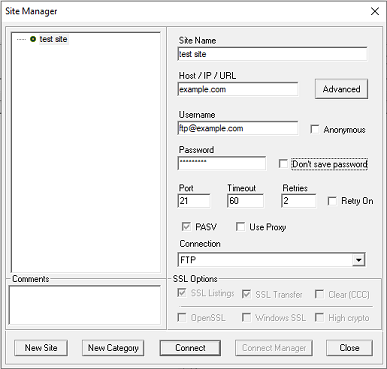
Once you get the application installed and run it for the first time, you will now be at the site manager screen. You may be prompted to choose a program for editing text files. Choose your favorite text editor.
There are several advanced features on this screen, such as the ability to save several sets of FTP account credentials. This is very useful if you manage several different websites. For this guide, however, we will focus on simply connecting with one account.
Once you have all this information entered, you can click on the Connect button at the bottom. You should now be connected to the server.
We will need to fill out the following fields:
- Site Name
- This is a name for this connection, it can be anything you like.
- Host/IP/URL
- This is the hostname. You can use either your domain name, the server name or the server IP.
- Username
- This is your FTP username that you set up in cPanel
- Password
- This is the password you set when you set up your FTP account.
The rest of the fields should be left to the default settings.
- Port – 21
- Timeout – 60
- Retries – 2
- Connection – FTP
Transferring files
Once connected, you can begin transferring files between your local machine and your web server.
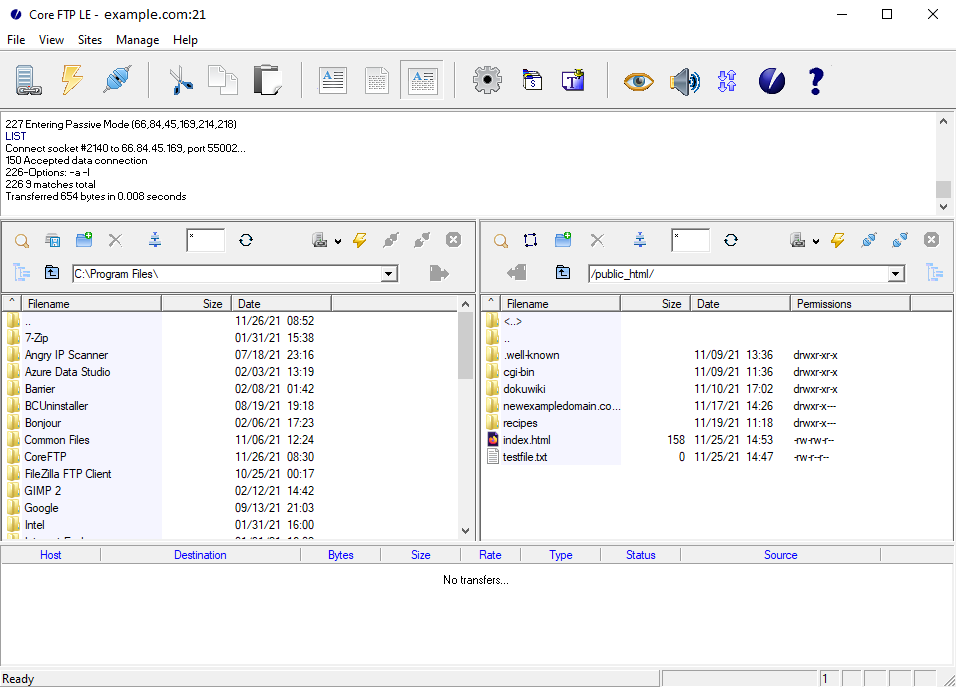
On the left hand side of the screen, you will see the file structure of your local machine.
On the right hand side of the screen, you will see the file structure of the remote server (your cPanel account).
You can transfer files now by dragging and dropping from one side to the other, or by right clicking on a file or folder and selecting upload/download.
If you have any further questions, please be sure to reach out to our support staff by using our chat service in your client area or by submitting a ticket.
One reply on “FTP Clients – CoreFTP”
[…] coreFTP […]