
Overview
Your DNS Zone Editor allows you to manage you domain’s zone file. This DNS is essential to your webhosting services. This guide will provide you with information in its use and how to manage it.
What is DNS
DNS (Domain Name Service) is used to convert human-readable domain names (example.com) into computer-readable IP addresses (192.168.42.69). DNS uses a zone file that reside on your name server to map domain names to IP addresses.
You can find more information on DNS here.
There are several different types of DNS records that your domain will need to function properly. While cPanel will set up your DNS zone file with default settings, you can add and edit your zone file as needed to use other services.
Please note
- When entering the ‘Name’, the system will automatically add the domain name to the end of the record, unless you end it with a ‘.’
- mail will be saved as mail.example.com
- mail.example.com. will be saved as mail.example.com
- mail.example.com will be saved as mail.example.com.example.com
- Your cPanel zone file is only in effect if you are using our name servers. If you are using different name servers, you will need to update your zone file with them before the changes take place, or, update your name servers with your registrar to use ours. While you can use any valid name servers with your services, using ours allows us to keep them up to date to avoid interruptions.
- Any time you make any changes to your zone file, you must allow for up to 24 hours for the records to fully propagated. While most modern servers will complete this within 4-6 hours, it is possible that some servers will take longer.
Managing Domain DNS
In order to manage your domain’s DNS records, you will need to navigate to the DNS Zone Editor app in the Domain section of your cPanel

If you do not know how to access your cPanel, you can find out here.
Once the app is loaded, you will see a list of your domains with several options:
- + A Record – this will add a new
Arecord for your domain - + CNAME Record – this will add a new
CNAMErecord - + MX Record – add a new
MXor mail exchange record - Manage – this will open the domain’s DNS manager where you can add, delete or edit your DNS records
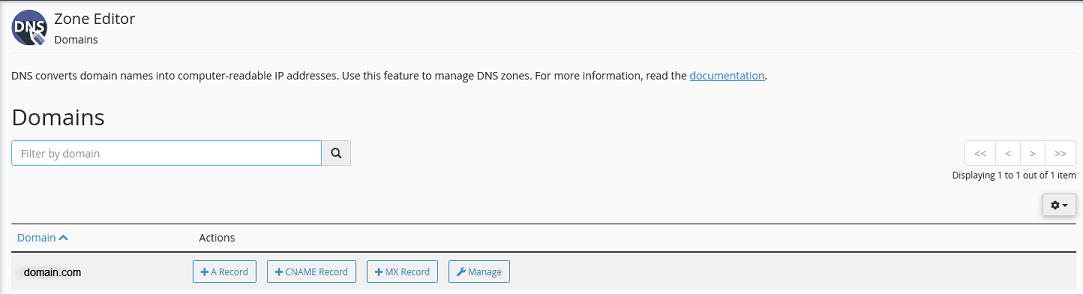
In most cases, you will want to click on Manage
Manage
Once you load the DNS manager for your domain, you will see several options
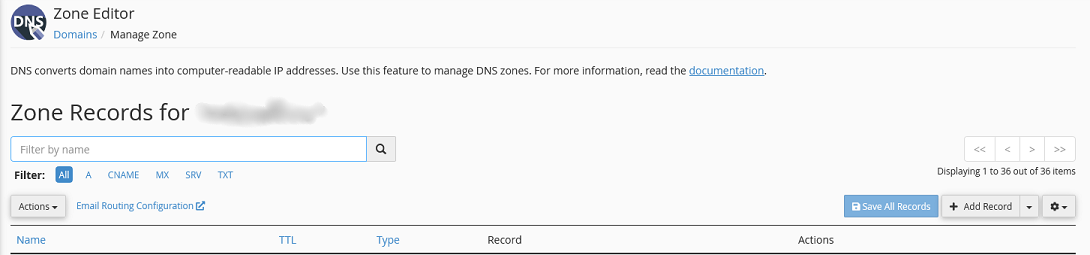
- Search Box – you can search the zone file for records
- Filter – filter the zone file for records by type
- Actions – Reset DNS Zone, this will reset your zone file to the default zone file for your server (Use caution, this is not reversible.)
- Email Routing Configuration – this will take you to the section where you can change your email routing (This is an advance function and is not typically altered)
- Save All Records – save all changes made
- + Add Record – add a new record, you can choose the type from the drop down menu
- Settings – change how many records are displayed per page, the page controls are the arrows just above these buttons
Add Record
On you click on the + Add Record button, you will see the following at the top of the DNS record list:

Fill in the fields and then click Save Record to add it
- Name – this is the name of the record (Ex. mail.example.com.) Please see this note regarding the Name field format.
- TTL – “Time to Live”, this tells DNS servers how long to cache the record before refreshing and is set in seconds. This generally does not need to be updated
- Type – this is the record type, see the this section for more about different record types
- Record – this field will change, depending on the record type you select. In this example, this would be the IPv4 address for this A record
- Save Record – save and update the zone file
- Cancel – discard changes
Edit Record
To edit a record, click on the Edit button to the right of the record.

Once you click on the Edit button, you will see the same fields as the Add Record button. Once again, these fields will change depending on the record type.
Delete Record
To delete a record, you only need to click the Delete button next to the Edit button.
Actions – Reset DNS Zone
This will delete all of your custom records and revert your zone file back to the one created by cPanel by default. Be careful before using this option as it is not reversible.
You can find this option on the left hand side of your screen, under the search bar and filter.
Record Types
While there are several different types of records you can use, the most common records will be:
- A records – resolve to an IP address
- CNAME records – resolve to a domain name
- TXT records – mainly used for information and verification
- MX records – control your email traffic
You can find more information on DNS record types here.
If you have any further questions, please be sure to reach out to our support staff by using our chat service in your client area or by submitting a ticket.
3 replies on “cPanel DNS Zone Editor”
[…] account, you can edit these records using your DNS Zone Editor in your cPanel. You can find out how here. If you do not know how to access your cPanel, you can find out […]
[…] web-based hosting management suite that you can use to manage all facets of your web hosting. From updating your DNS to adding new email address, it can all be done from your cPanel. You can find more information on […]
[…] Once you have your private name servers set up with the registry, you will need to add the A records in your dns zone file. If you are using our cPanel based web hosting, you can find information on updating your records here. […]